Big Walk Telescope Puzzle — Opening the Sealed Cave Box
Last verified: August 17, 2026 · The earliest two-player puzzle on the island, and the one that teaches the hold-and-grab rule.
The telescope puzzle — a sealed box wedged among the rocks near the starting area — looks like a one-person job until you walk to the switch. The telescope that controls it sits on the far side of the map, and the box only stays open while someone keeps the button pressed. It is the game's first real lesson in "one player holds, one player collects," and it feeds straight into the drawbridge key chain.
Location
The sealed box sits in a patch of rocks near the island's starting area — players heading for the beach or the first tower pass it constantly. The box has no obvious latch, no switch, nothing to press; it looks like scenery until someone finds the telescope.
The controlling telescope is on the right side of the map, well out of sight of the box. It is one of the big landmark telescopes scattered around the island, the kind you climb onto to orient yourself — except this one has an interaction prompt that a plain lookout telescope does not.
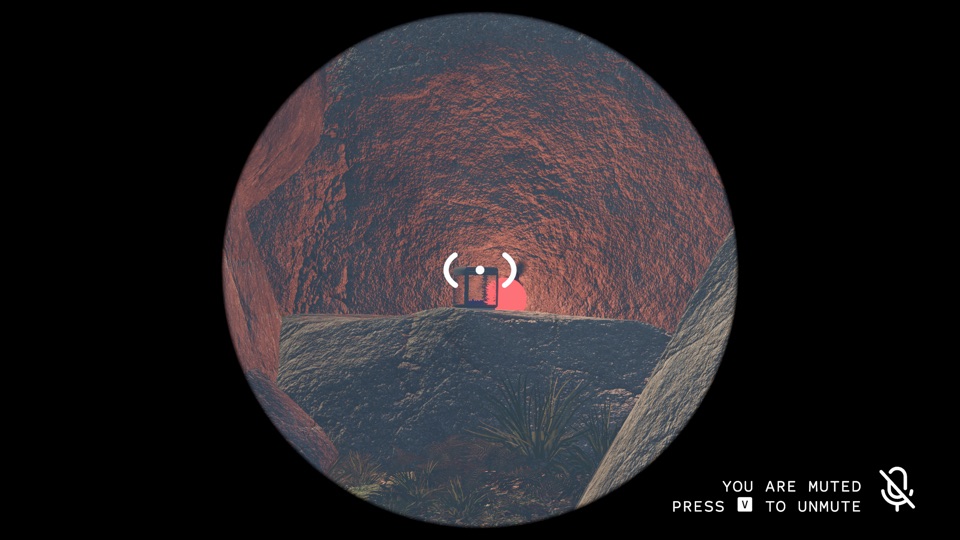
The sealed box puzzle — the telescope across the rocks keeps it open while a player grabs the gourd.
How the Box Works
The puzzle runs on a simple rule that the game never states: the box stays open only while the telescope's switch is held. Press the switch and a red light flares up over the box's location, marking it from across the rocks; release the switch and the light dies, and the box snaps shut. The distance between the two spots is deliberate — you physically cannot hold the button and reach the gourd at the same time.
The red light is the whole navigation aid. It tells the runner exactly which of the identical rock formations holds the open box, so the run is less about memory and more about speed.
2-Player Solution
- One player climbs to the telescope and presses the switch. The red light appears over the box.
- The second player runs to the box while it is held open and grabs the gourd inside.
- The holder keeps the button pressed until the runner is clear — the box closes instantly the moment the button is released, and it closes on anyone still reaching inside.
- Drop the gourd into the bridge's slot (the drawbridge structure near the starting area) and move on to the other gourds.
That is the entire solve. The only real skill is communication: the runner calls out when they are at the box and when they are clear, and the holder keeps the button warm until they hear "clear."
Timing & Common Mistakes
- Releasing too early. The classic wipe. The runner is inside reaching for the gourd, the holder gets distracted, the box slams shut, and the run restarts. Hold until the runner says clear, then a beat longer.
- Losing the red light. If the holder releases to check where the runner is, the light dies and the runner has no marker — keep the button held and let the runner navigate by landmarks instead.
- Sending the runner before the light is up. The box only opens while the switch is held, so the runner should start moving after the red light appears, not before.
- Confusing the box with the nearby scenery. Several rock piles look identical; the red light is the only reliable marker, so wait for it before committing to a route.
3-4 Player Notes
Extra players make this puzzle nearly free. The cleanest layout is one holder at the telescope, one runner at the box, and a spotter standing halfway between them relaying "light is up" and "runner is clear" so neither end has to shout across the island. With four players you can also stage a second runner at the box's exit — the gourd pops out the moment the box opens, so a waiting pair can grab it and leave before the holder even counts to three.
The Reward Chain
The gourd from this box is one of four gourds scattered around the starting area — the drawbridge puzzle (opening the island), the green structure switches, the mechanical arm stacking puzzle, and this telescope box each yield one. Drop all four into the drawbridge's slots and a key appears. Run that key through all five key cutters — three north of the bridge spot, two on the beach — following the arrow each cutter reveals, and the finished key opens the drawbridge.
Past the drawbridge you will also spot a blue doorway with its own key cutter and a locked door: that is the map room, which needs the Red Tower's key instead. See the puzzle guide for the full tower order.
Not the Other Telescope Puzzles
The island has more than one telescope, and only this one opens a box:
- Lookout telescopes (the climbable landmarks): pure orientation, no switch, no puzzle. They reveal glowing collectibles when you look through them.
- The mountain gesture puzzle (Red Tower area): telescopes and charades — players strike poses that others identify through a telescope. Entirely different mechanic.
- This cave box telescope: the only one with a hold-to-open switch and a red light marker.